
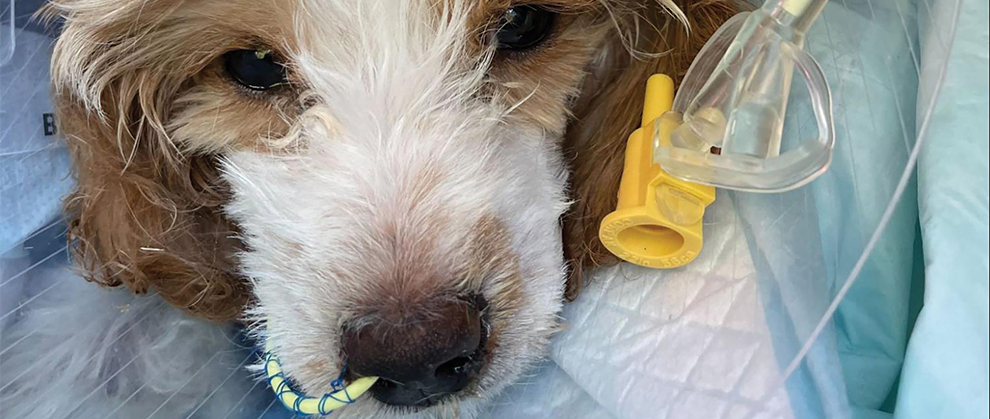
Veterinary critical care commonly involves use of nasogastric or nasoesophageal feeding tubes to provide nutritional support to patients that are unable or unwilling to eat. Early nutritional intervention helps improve patient recovery, reduce complications associated with prolonged anorexia, and support metabolic needs of critically ill patients. Although nasogastric and nasoesophageal tubes share similar placement techniques and indications for use, they differ in their termination points and certain clinical applications. Correct placement technique, verification of tube location, and routine maintenance are essential to ensure patient safety and effective use of feeding tubes.
Take-Home Points
- Nasogastric and nasoesophageal tubes are minimally invasive options for providing early enteral nutrition and can be placed by a credentialed veterinary nurse with placement training.
- Early nutritional support improves healing and overall outcomes, including reduced recovery time for critically ill patients.
- Nasogastric tubes terminate in the stomach and enable both feeding and gastric decompression; nasoesophageal tubes terminate in the distal esophagus and are used only for feeding.
- Accurate measurement of tubes and radiographic confirmation of placement ensure correct tube placement and reduce the risk for complications.
- Possible complications include epistaxis, aspiration pneumonia, tube dislodgement, gastrointestinal issues, or accidental tracheal placement, underscoring the critical value of careful technique and placement verification.
Nasogastric and nasoesophageal tubes are similar in terms of placement technique, indications, and functions but differ in where they terminate. Nasogastric tubes terminate in the stomach and can be used for both nutritional support and gastric decompression; nasoesophageal tubes terminate in the distal esophagus and are used primarily for delivering nutrition. This article reviews the indications, contraindications, potential complications, and placement techniques for both types of feeding tubes as well as maintenance and troubleshooting tips.
Indications
Nasogastric and nasoesophageal tubes are used to provide short-term (1 to 7 days) nutritional management for patients that cannot or will not eat. Critically ill patients require nutritional support as early as possible, as delayed nutrition results in delayed healing and recovery and increased hospitalization time.1,2 The value of early nutrition includes feeding enterocytes in the intestines; reducing the risk for bacterial translocation; addressing hypoproteinemia, hypoalbuminemia, and hypoglycemia; and providing electrolyte support, all of which play a key role in the management of critically ill patients. 1,2
Placement of either type of tube does not prevent the patient from eating or drinking and often leads to patients eating sooner on their own. Nasogastric tubes can also be used to decompress the stomach by suctioning out gastric contents, which increases gastrointestinal motility, reduces nausea, and reduces the risk for aspiration pneumonia.3
Nutrition is indicated for many disease conditions (e.g., gastrointestinal diseases such as parvovirus and pancreatitis) for which patients have historically had food withheld.4 Other indications include trauma (e.g., fractured mandibular symphysis) or any condition that causes anorexia. Nasogastric and nasoesophageal tubes are used for short-term nutritional management versus esophagostomy, gastrostomy, or jejunostomy tubes, which are used for long-term management. Nasogastric and nasoesophageal tubes are ideal for patients that need short-term nutritional support but are unable to undergo anesthesia.
Contraindications and Complications
Contraindications and complications for use of nasogastric and nasoesophageal feeding tubes are similar.
Contraindications include severe facial trauma, coagulopathy, severe dyspnea, and comatose status with no pharyngeal reflex and an inability to protect the airway. Other feeding management tubes may be more appropriate for those patients, depending on the individual situation.
Complications include accidental tracheal intubation, which can lead to aspiration pneumonia, lung injury, or pneumothorax.5 Other complications include epistaxis, rhinitis, dacryocystitis, regurgitation, vomiting, or sneezing. Tube dislodgement can result from improper securement or patient interference. Refeeding syndrome is also a potential consequence for any patient receiving tube feeding.
One complication unique to nasogastric tubes is that they pass the lower esophageal sphincter and terminate in the stomach, which could lead to gastroesophageal reflux and esophagitis. However, no significant difference has been identified between nasogastric and nasoesophageal tube complication rates, and the choice is largely clinician preference.6
Placement Techniques
Nasogastric and nasoesophageal tube placement techniques are similar with a few key differences.
Nasogastric Tube
Step 1. Assemble the needed supplies (BOX 1, FIGURE 1).
- Examination gloves
- Medication for light sedation
- Correct-size tube (50%–75% diameter of the nare)
- Radiograph machine
- Permanent marker
- Stethoscope
- Sidestream end-tidal carbon dioxide monitor (optional)
- Topical anesthetic drops
- 2% lidocaine lubricant or sterile lubricant if lidocaine lubricant is not available
- Suture material and needle (e.g., 3-0 monofilament suture and 20-gauge needle or needle drivers and swaged needle)
- Saline for flushing
- Syringes for gastric emptying/air test
- Graduated cylinder to measure gastric contents produced (not required every time a nasoesophageal/nasogastric tube is placed, but it is best to be prepared)
- Syringe/intravenous fluid pump and fluid line with extension
- Elizabethan collar
- Adhesive tape
- Assistant to restrain the patient
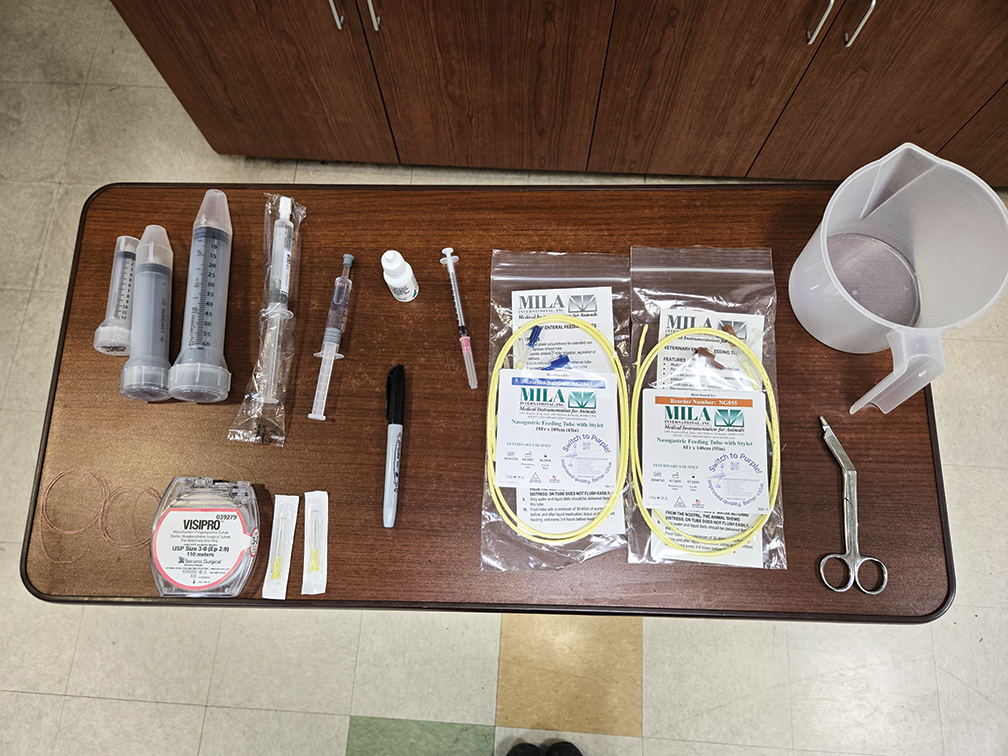
Figure 1. Suggested supplies for placing nasogastric and/or nasoesophageal tubes.
Step 2. Sedate the patient. Lightly sedate the patient, if needed. Some critically ill patients may not need sedation, but many patients may. Ideally, the patient should have an intact pharyngeal reflex.
Step 3. Numb the nares. Place 4 to 5 drops of local anesthetic into the desired nostril. During the few minutes before it takes effect, measure and prepare for tube placement.
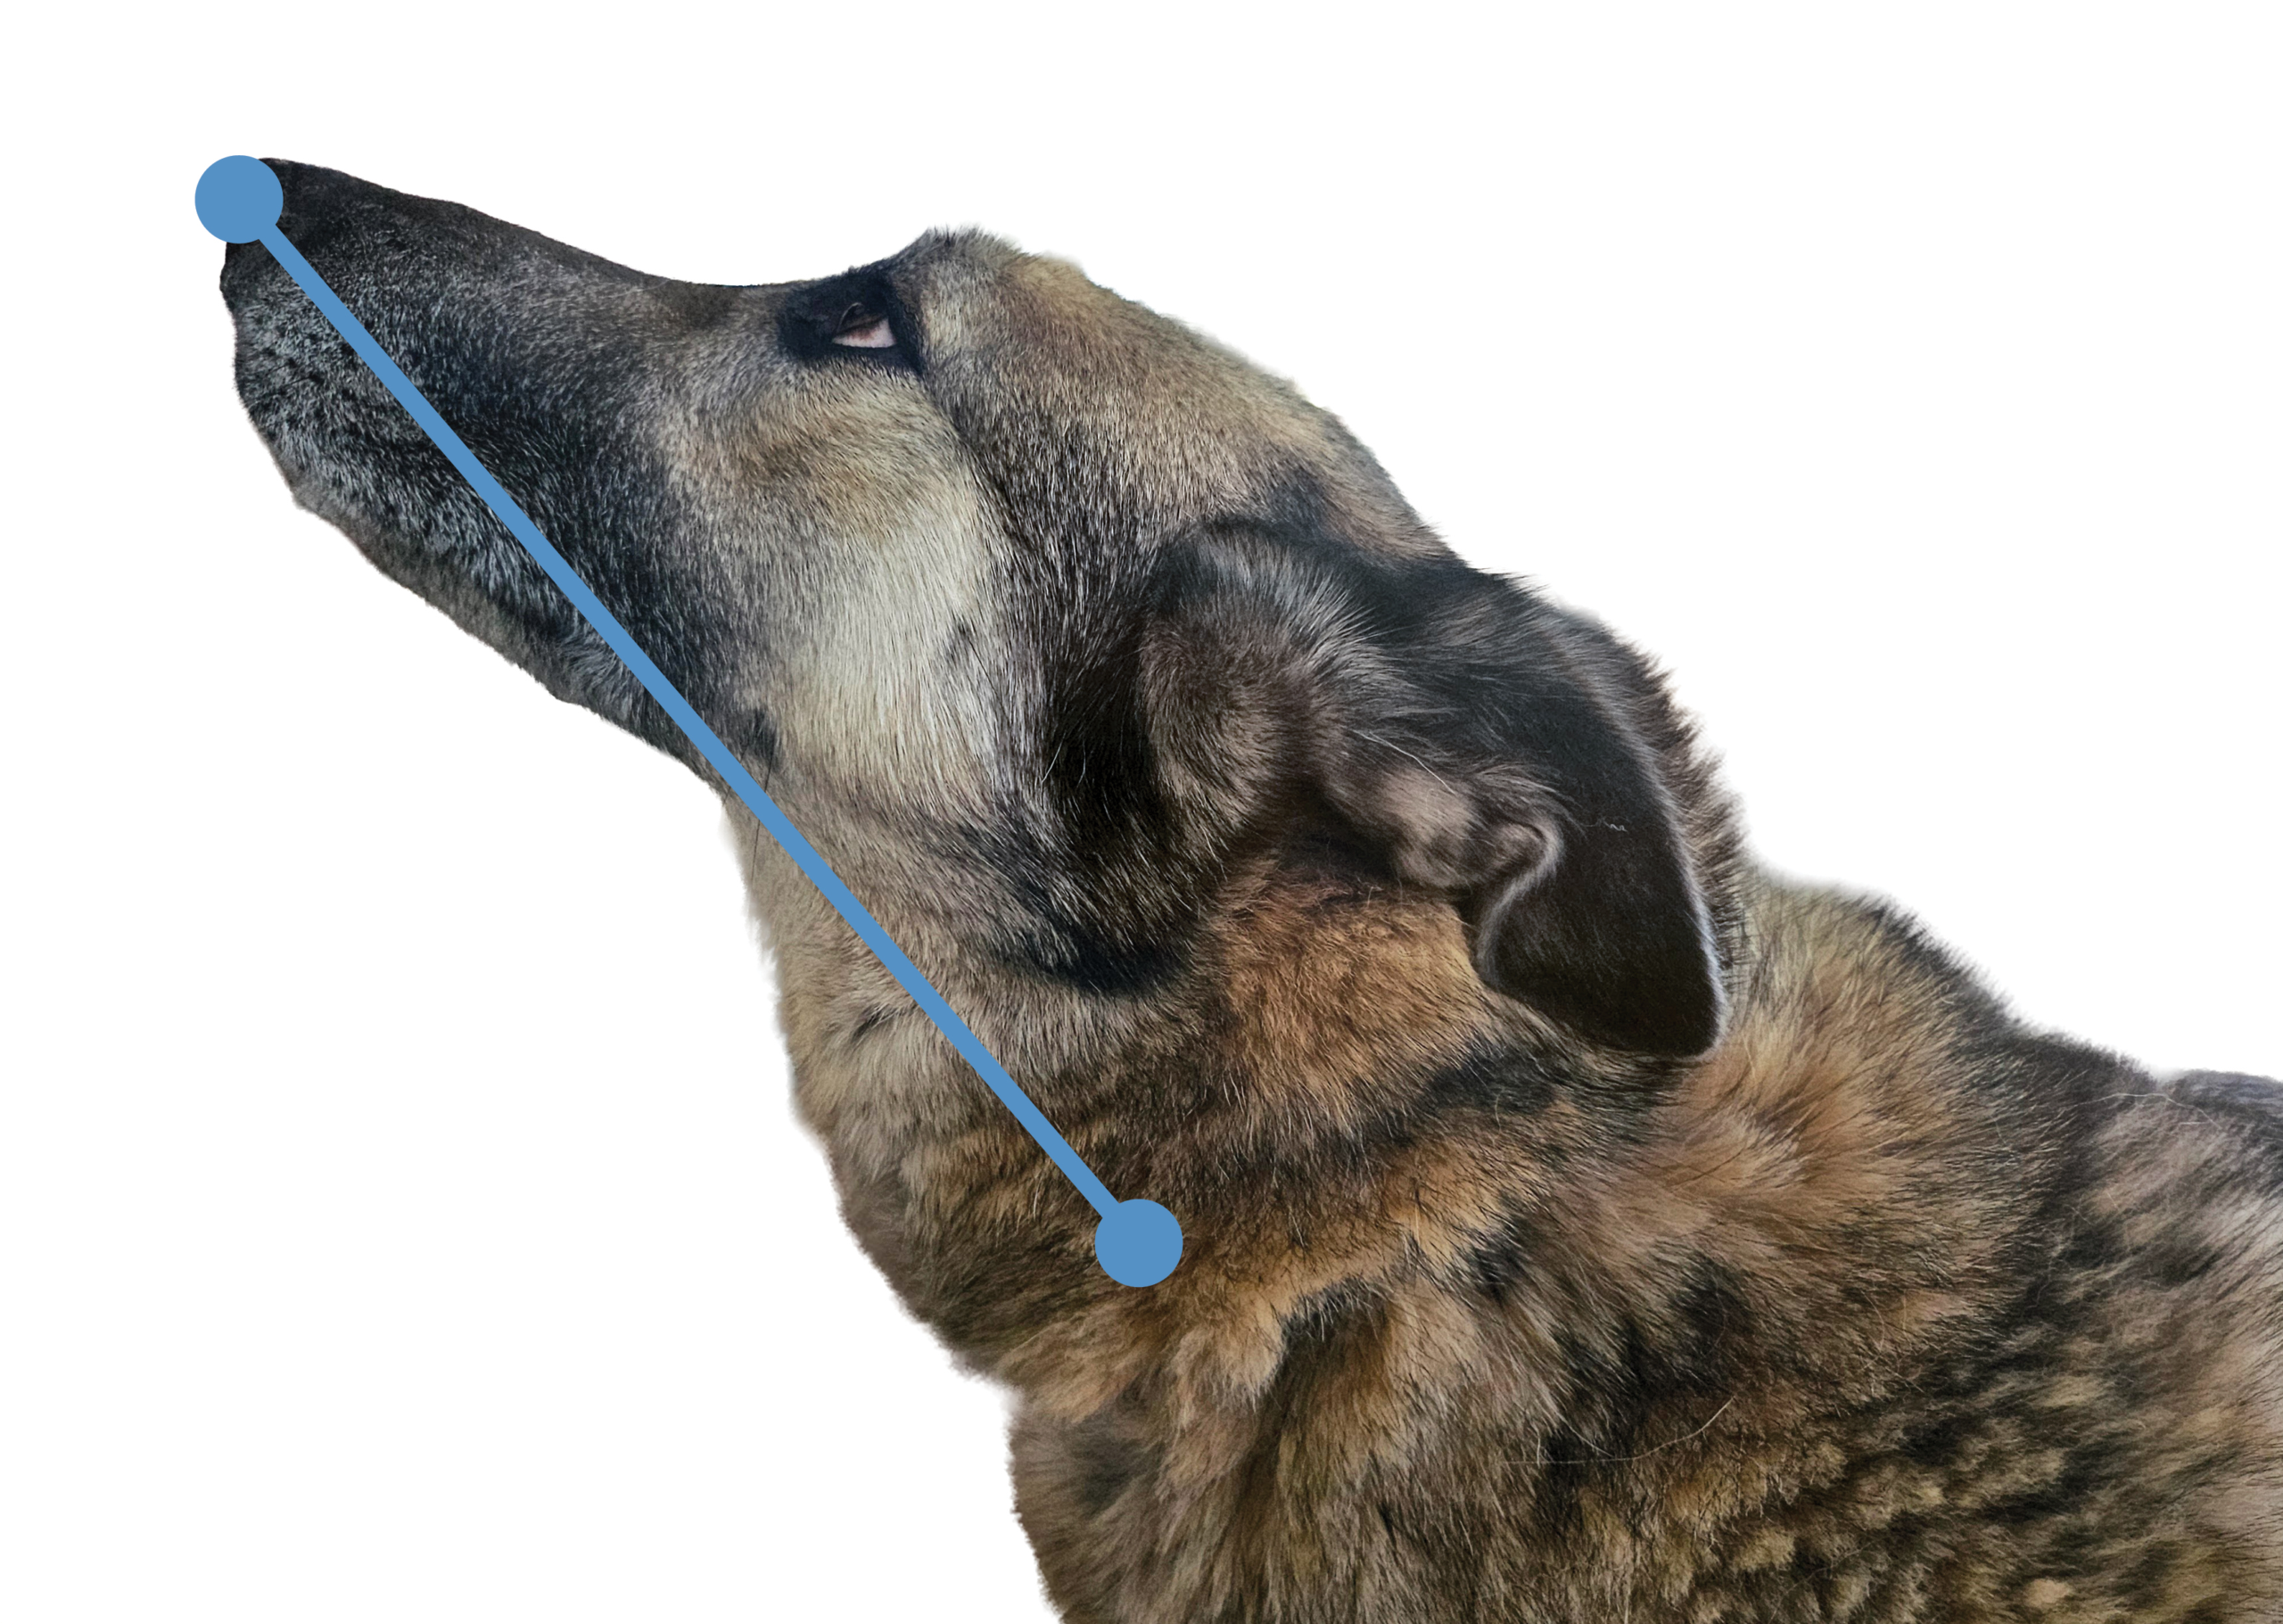
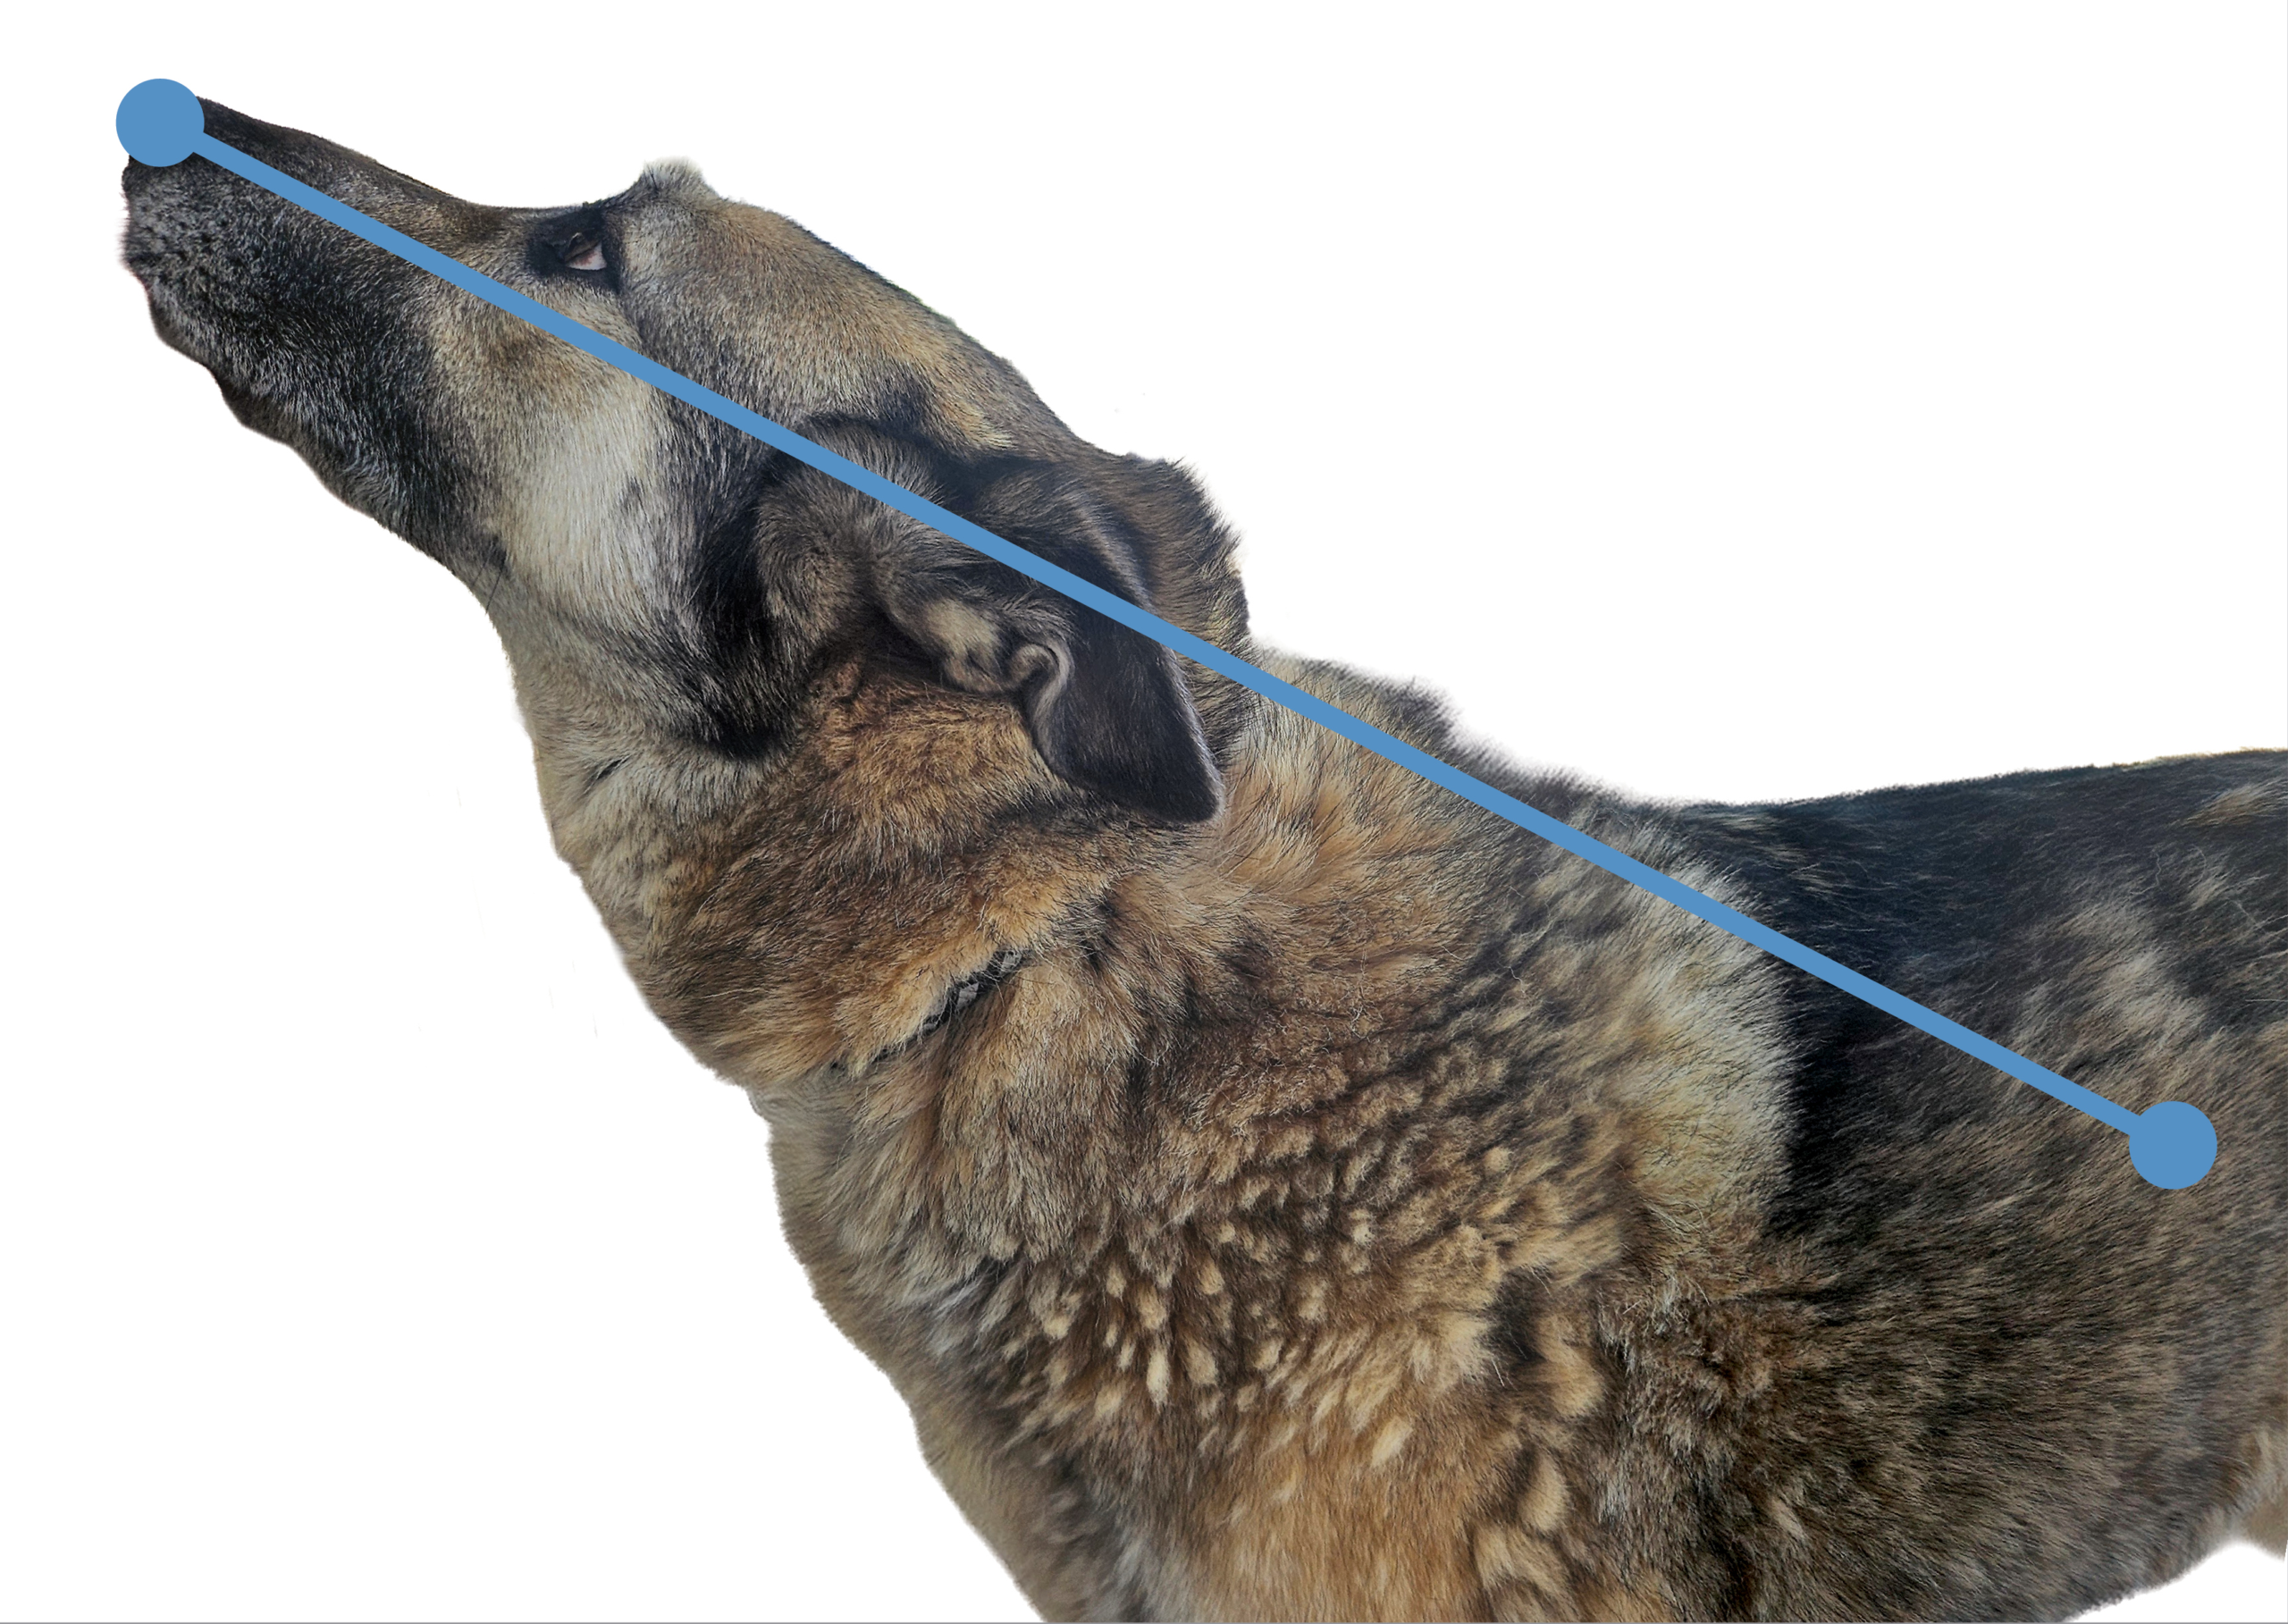
Step 4. Measure tube distance needed. Measure from the nasal planum to the thoracic inlet7 and from the nasal planum to the last rib. Mark the measurements on the tube with permanent marker or note the measurements (FIGURES 2 AND 3).
Step 5. Prepare for securing the tube. Apply topical lidocaine gel or topical anesthetic behind where the nares meet. Various methods of nasogastric/nasoesophageal tube securement have been described. Technique selection may vary based on clinician preference, patient tolerance, and available materials. The author suggests placing a 20-gauge needle near where the nares meet on the desired side, feeding 3-0 suture through the needle, leaving tails long on each side, before removing the needle (FIGURE 4). A traditional swaged needle and suture can be used if desired instead. Note: This step can be completed after tube placement; however, doing it first makes it easier to be able to quickly secure the tube if the patient starts moving.
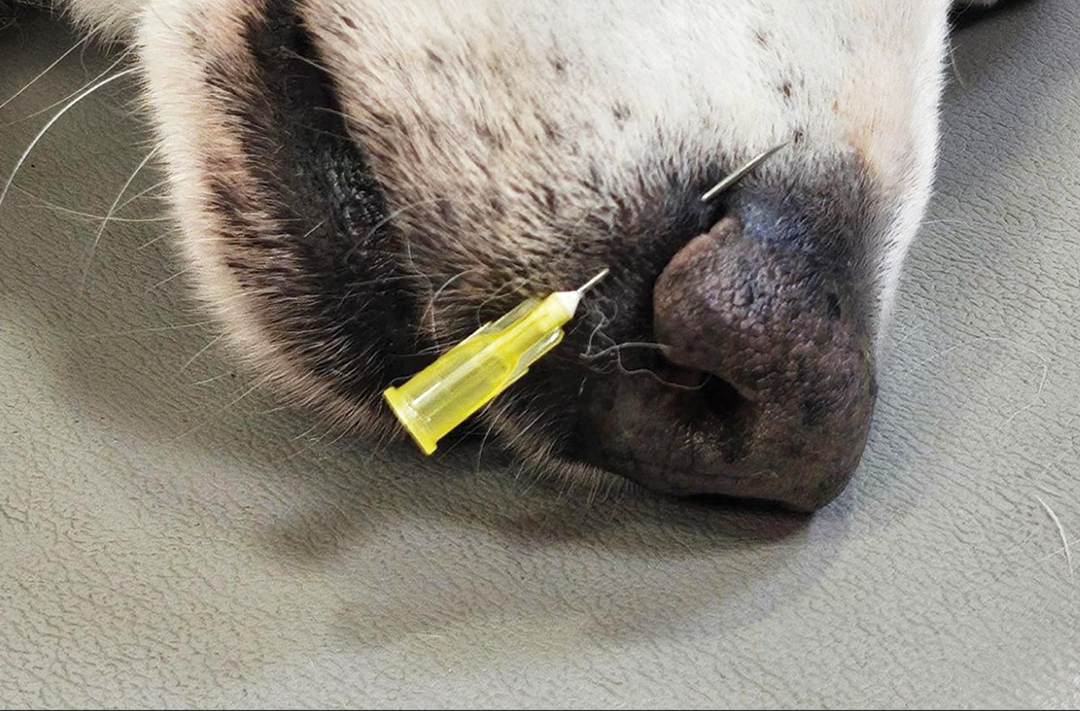
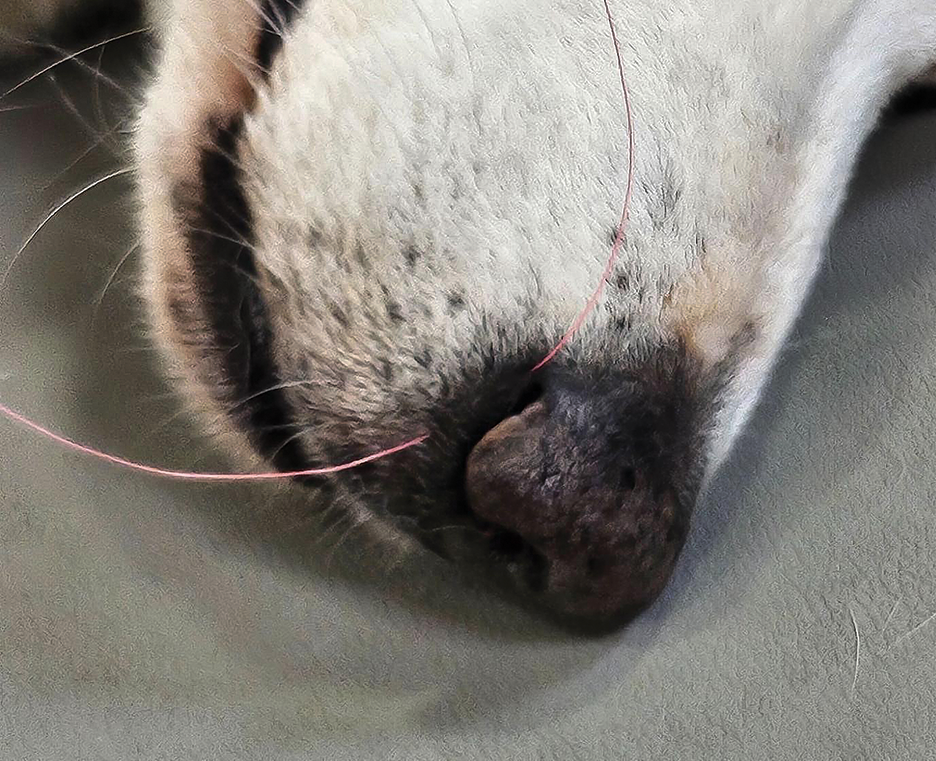
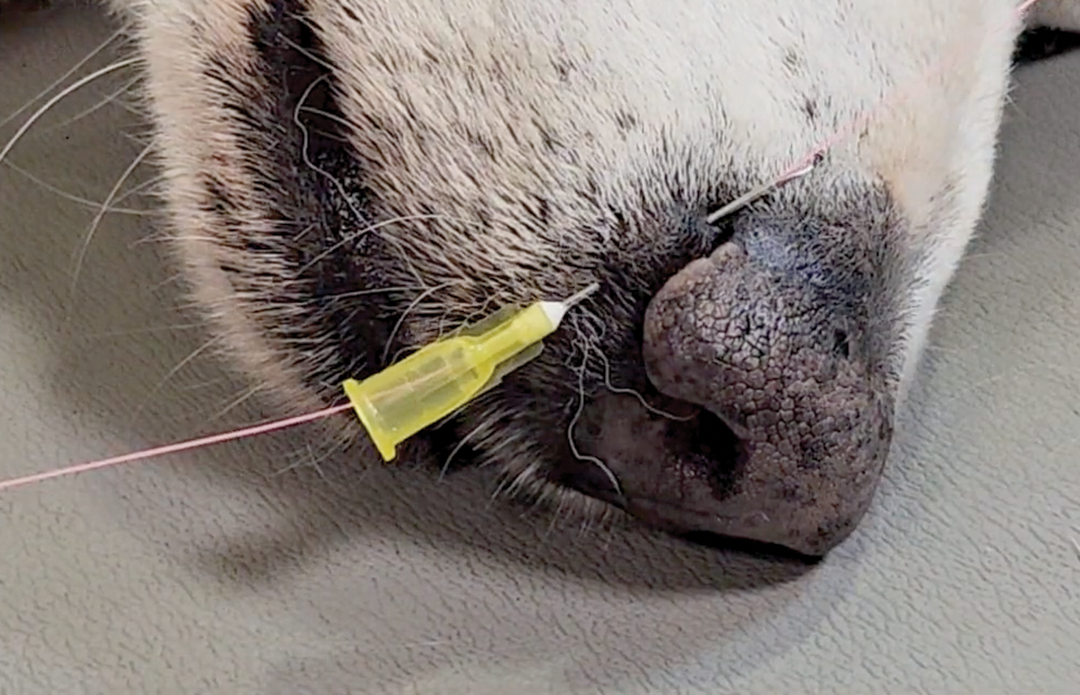
Step 6. Lubricate the stylet. If using a nasogastric tube with a stylet, remove the stylet and lubricate the entire stylet with sterile lube; replace the stylet.
Step 7. Position the patient. Have the assistant hold the patient sternal or in lateral recumbency with the head in a neutral position. Point the nose upward.
Step 8. Insert the tube. With the nose pointed upward, insert the nasogastric tube in a ventromedial direction (FIGURE 5). If crunching or obstruction is noted, remove and redirect the tube.
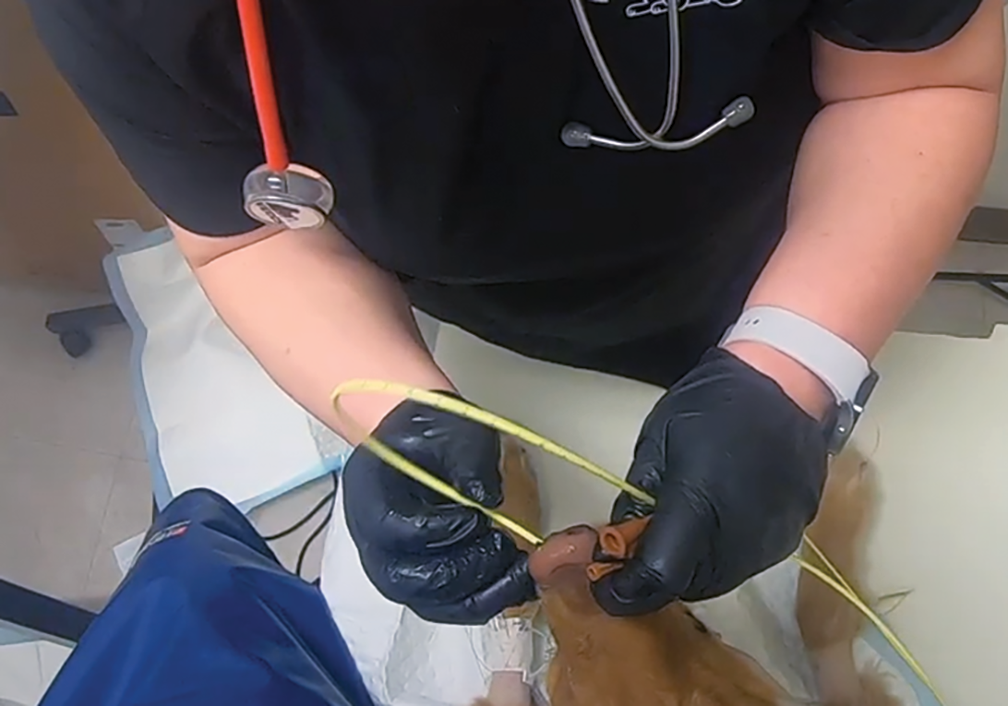
Figure 5. Inserting the feeding tube.
Step 9. Advance the tube. Feed the tube to the ventral ramus of the mandible, then have the restrainer point the patient’s head down (flexing the neck) while you advance the tube to the thoracic inlet.
Step 10. Verify correct tube placement.
- If the tube type allows, aspirate the tube. The tube should have negative pressure; if not, remove and redirect the tube.
- End-tidal carbon dioxide monitoring, if available, can help detect tracheal placement. Detectable carbon dioxide indicates that the tube may be in the airway, and the tube should be removed.
- Swallowing is a good sign, whereas coughing may indicate accidental tracheal intubation.
- Take a lateral radiograph to verify placement in the esophagus before advancing the tube to further ensure that the tube is in the correct place (FIGURE 6).7
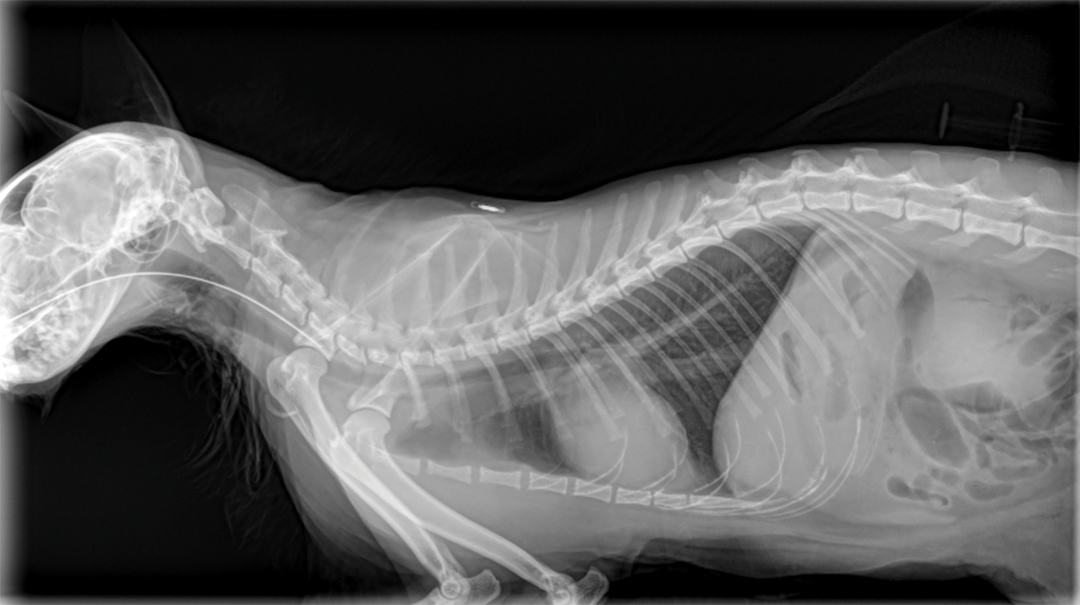
Figure 6. Lateral radiograph showing the nasogastric tube in the esophagus.
Step 11. Further advance the tube. Feed the tube to the second mark (last rib).
Step 12. Further verify correct tube placement. Take ventrodorsal and lateral radiographs from the thoracic inlet to the stomach (FIGURE 7).
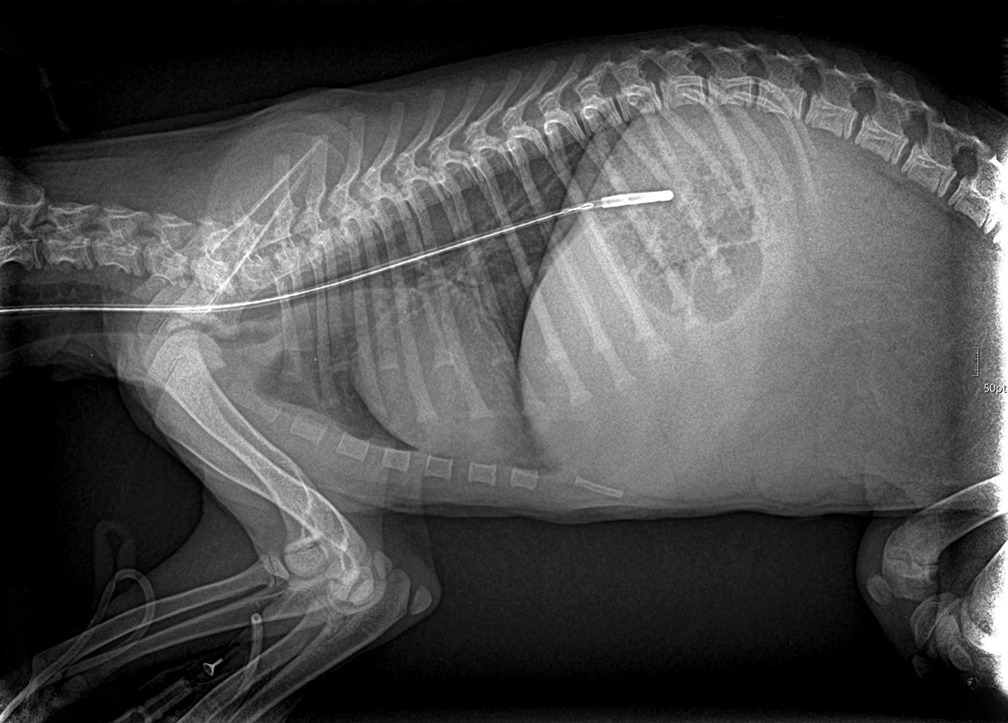
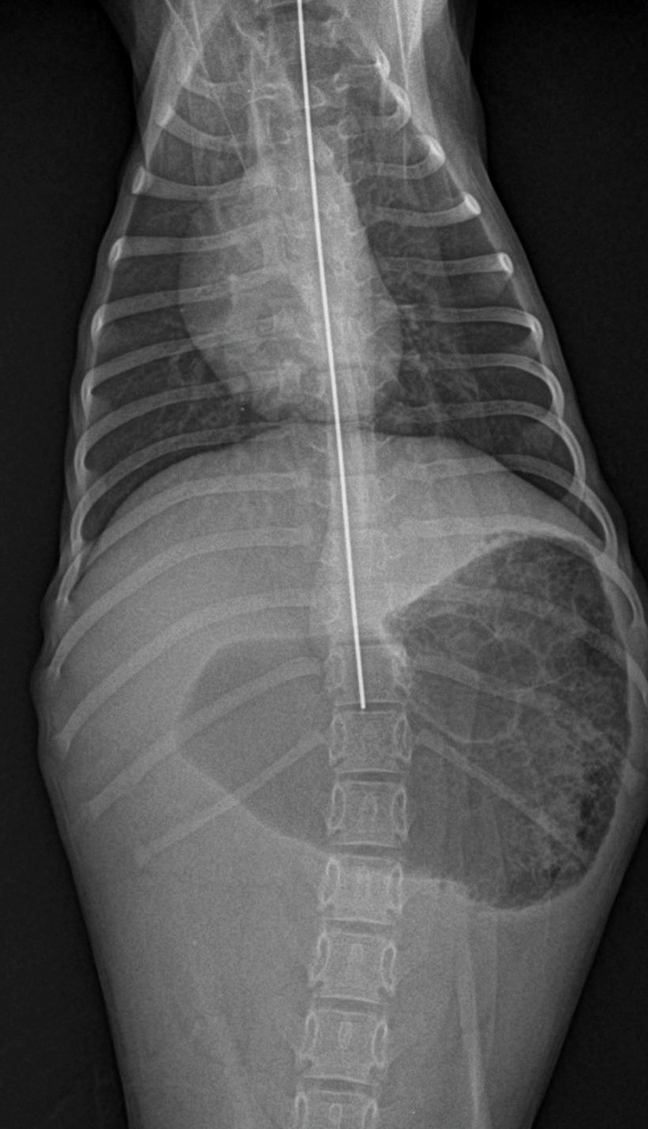
- You should be able to visualize the tube from the nasopharynx to the stomach.
- Ideally, take radiographs after removing the stylet.
- Tests for verification include:
- Aspiration test: Aspirate with a syringe. Aspiration of gastric contents is a good sign. There should be negative pressure eventually (may have some air).
- Air test: Auscultate the stomach with a stethoscope and slowly inject 3 to 6 mL of air into the nasogastric tube. Listen for bubbling sounds (FIGURE 8).
- Saline test: Inject 3 to 6 mL of sterile saline into the tube slowly; monitor for coughing if the patient is conscious.
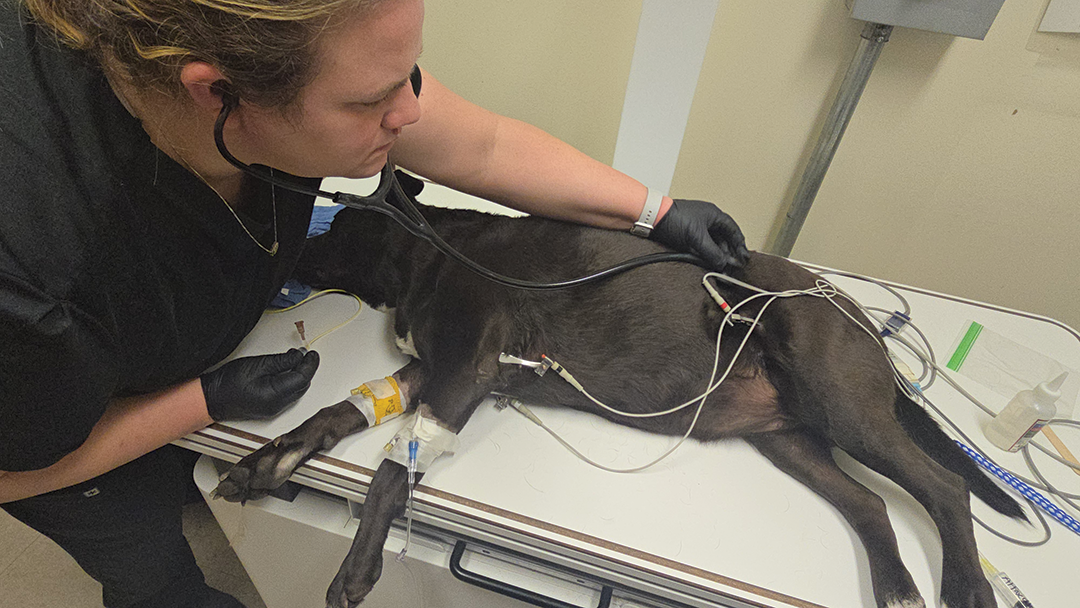
Figure 8. Listening for bubbling after injecting air into the nasogastric tube.
Step 13. Secure the tube. After correct tube positioning is confirmed, secure the rest of the suture by using a finger trap pattern. Place a second finger trap pattern or butterfly tape and suture along the cheek or over the bridge of the nose.
- Avoid whiskers, which are very sensitive/painful, and may result in the patient attempting to remove the tube with their paws or claw it out.
- It is acceptable to suture on the cheek or between the eyes; consider the patient’s anatomy (FIGURE 9).
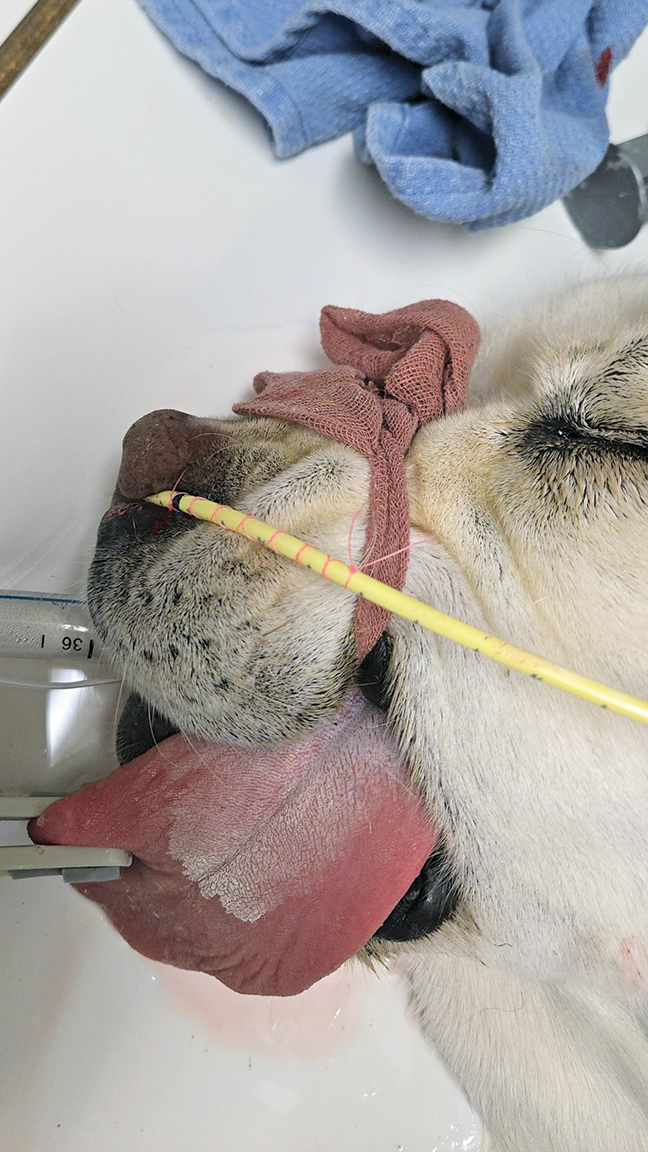
Figure 9. Feeding tube secured in place. Note avoidance of whiskers and placement of additional finger trap sutures along the cheek.
Step 14. Prevent tube displacement. Place an Elizabethan collar on the patient, and secure the remaining tube to the collar with tape (FIGURE 10).
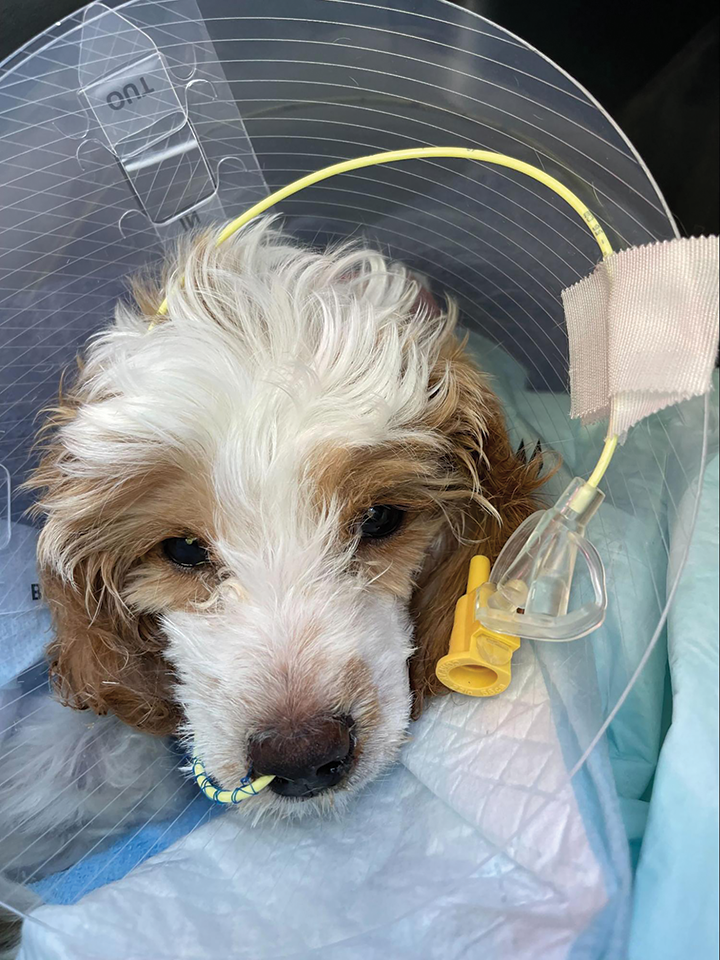
Figure 10. Dog with a nasogastric tube, wearing an Elizabethan collar with the tube secured to the collar.
Step 15. Record measurements in the medical record. Note location of the nasogastric tube, size, and centimeter mark where it was placed (if available).
Nasoesophageal Tube
Steps 1–3. Follow the same steps as for nasogastric tube placement.
Step 4. Measure tube distance needed. Measure from the nasal planum to the thoracic inlet (FIGURE 3) and from the nasal planum to the 7th to 9th intercostal space and mark the measurement on the tube or note it.
Steps 5–10. Follow the same steps as for nasogastric tube placement.
Step 11. Advance the tube. Feed the tube to the second mark (7th to 9th intercostal space).
Step 12. Verify correct tube placement. Take ventrodorsal and lateral radiographs from the thoracic inlet to the distal esophagus. You should be able to visualize the tube from the nasopharynx to the distal esophagus (FIGURE 11). Tests for verification include:
- Aspiration test: Same as that for nasogastric tube placement.
- Air test: Auscultate the distal esophagus with a stethoscope and inject 3 to 6 mL of air into the nasoesophageal tube. Listen for bubbling sounds.
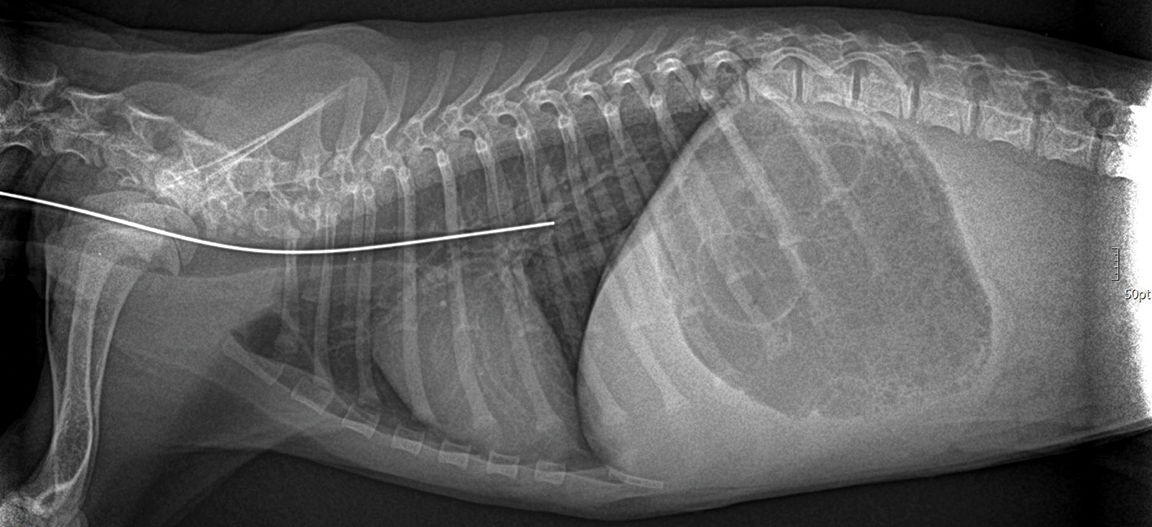
Figure 11. Lateral radiograph showing placement of the nasoesophageal tube.
Steps 13–15. Follow the same steps as for nasogastric tubes.
Tube Maintenance
Nasogastric Tubes
Initially, aspirate the tube every 1 to 2 hours, then every 4 to 8 hours according to gastric output.
It was previously believed to be ideal to return approximately one-third of the gastric contents aspirated to prevent electrolyte imbalance secondary to large volumes being aspirated. However, a 2018 study demonstrated no increased risk for hypochloremia if gastric contents are not returned.8
Note the amount aspirated. Confirm that negative pressure has been achieved. Flush the tube with 3 to 5 mL of warm water to ensure patency and 5 to 10 mL after feeding to prevent clogging.
Nasoesophageal Tubes
Aspirate the tube to confirm negative pressure before feeding. Flush the tube with 3 to 5 mL of warm water to ensure patency and 5 to 10 mL after feeding to prevent clogging. For critically ill patients, warm water is ideal to reduce the risk for hypothermia.
Patient Care
- Properly maintained nasogastric/nasoesophageal tubes may remain in place for up to 10 days, depending on the tube type, tube material used, and the patient’s needs.
- Patients with a feeding tube should generally have an Elizabethan collar in place to prevent them from removing the tube. Elizabethan collars, however, may hinder natural grooming; therefore, cleaning and grooming should be a part of patient care.
- Clean the external nares as needed with a wet, warm washcloth.
- If the tube is no longer patent or its patency is in question, the sutures can be removed and the tube kinked and removed from the patient’s nose in a single smooth motion.
Troubleshooting and Monitoring
Nasogastric and nasoesophageal tubes can occasionally become occluded. Regular carbonated soda (e.g., Coca-Cola), enzymatic solutions, or sodium bicarbonate can be used to clear any occlusions.
During hospitalization, absence of gastric contents aspirated from the nasogastric tube requires troubleshooting (e.g., repeated aspiration, air and/or saline test, verification that tube is still at the originally measured centimeter mark, repeated radiographs). If in doubt, verify tube placement by radiography and have the veterinarian confirm. Sometimes gastric content may not be produced if small volumes are fed or the patient’s gastrointestinal motility is increased. Proper tube maintenance prevents problems and is easier than replacing the tube.
Trickle and Bolus Feeding
Although specific nutritional recommendations are beyond the scope of this article, resting energy requirement (RER) can be calculated (BOX 2).9 After tube placement has been confirmed, enteral feeding plans can be based on the patient’s RER or a fraction thereof. Often, feeding an anorexic patient will start at one-third RER, and the goal is to increase the amount by one-third RER, as the patient tolerates, every 12 to 24 hours to reach full RER.2 Patient tolerance to bolus or trickle feeding should be based on the presence or absence of vomiting, regurgitation, nausea, abdominal distension, diarrhea, or increased gastric residual volume.
- Start a 6-hour constant-rate infusion of recovery liquid at one-third of total RER.
- Recovery liquid is 1 kcal/mL. Patient weight is 33 kg (73 lb).
RER = 70 × 330.75
- 70 × 13.77 = 963.9 kcal/day
- 963.9 kcal/day × 0.33 = 318 kcal/day (rounded)
- 318 kcal/day ÷ 24 hr/day = 13.25 kcal/hr
- 13.25 kcal/hr ÷ 1 kcal/mL = 13.25 mL/hr
- 13.25 mL/hr × 6 hours = 79.5 mL total needed
For Bolus Feeding
- Calculate one-third RER per day and bolus feed every 6 hours.
- Recovery liquid is 1 kcal/mL. Patient weight is 33 kg.
RER = 70 × 330.75
- 70 × 13.77 = 963.9 kcal/day
- 963.9 kcal/day × 0.33 = 318 kcal/day (rounded)
- 318 kcal/day ÷ 4 = 79.5 kcal every 6 hr
- 79.5 kcal ÷ 1 kcal/mL = 79.5 mL/bolus feeding
Nutritional support can be achieved via continuous trickle feeding or intermittent bolus feeding (dividing up the patient’s portion of RER over approximately 4 feedings per day).
When trickle feeding, to prevent bacterial growth in the trickle feeding line, change trickle feeding extensions (the line from the syringe to the nasogastric/nasoesophageal tube connection) every 24 hours, draw up a maximum of 4 to 6 hours of enteral feeding formula at a time, and store the open food in the refrigerator.
When bolus feeding, avoid exceeding 10 to 12 mL/kg, including flush volumes, and monitor the patient for signs of overhydration when using water-based diets.
Summary
Nasogastric and nasoesophageal tubes are valuable tools for providing early enteral nutrition in critically ill patients. Although placement techniques are relatively straightforward, careful measurement, verification of tube location, and diligent monitoring are essential to ensure patient safety. Veterinary nurses play a critical role in proper tube placement, maintenance, and monitoring, which help prevent complications and support optimal patient recovery.
- Record the tube size, insertion length, and external centimeter mark immediately after placement. Recheck and document the mark in the medical record regularly to identify tube migration early.
- Confirm nasogastric and nasoesophageal tube placement via radiography. Radiographic confirmation should be obtained before administering food, water, or medications.
- To maintain patency and reduce tube occlusion, flush feeding tubes with warm water before and after feedings or medication administration.
- Monitor any patient receiving enteral nutrition for complications (e.g., vomiting, aspiration, tube dislodgement, signs of refeeding syndrome).
References
- Liu DT, Brown DC, Silverstein DC. Early nutritional support is associated with decreased length of hospitalization in dogs with septic peritonitis: A retrospective study of 45 cases (2000-2009). J Vet Emerg Crit Care (San Antonio). 2012;22(4):453-459. doi:10.1111/j.1476-4431.2012.00771.x
- Tonozzi C. Nutritional status. In: Kirby R, Linklater A, eds. Monitoring and Intervention for the Critically Ill Small Animal: The Rule of 20. 2nd ed. Wiley-Blackwell; 2020:285-302.
- Chan DL. What’s new in critical care nutrition. Presented at: International Veterinary Emergency and Critical Care Symposium; September 7–11, 2022; San Antonio, Texas.
- Yagi K. How and why to feed canine parvovirus patients right away. Todays Vet Tech. 2016;1(5):8-20.
- Hanchate AN, Flores RS, Cline MG. Pneumothorax as a complication of nasogastric feeding tube placement in six dogs. J Vet Emerg Crit Care (San Antonio). 2025;35(3):274-278. doi:10.1111/vec.13477
- Camacho F, Humm K. Complication rates associated with nasoesophageal versus nasogastric feeding tube placement in dogs and cats: a randomised controlled trial. J Small Anim Pract. 2024;65(7):417-423. doi:10.1111/jsap.13729
- Herring JM. A novel placement technique for nasogastric and nasoesophageal tubes. J Vet Emerg Crit Care (San Antonio). 2016;26(4):593-597. doi:10.1111/vec.12474
- Chih A, Rudloff E, Waldner C, Linklater AKJ. Incidence of hypochloremic metabolic alkalosis in dogs and cats with and without nasogastric tubes over a period of up to 36 hours in the intensive care unit. J Vet Emerg Crit Care (San Antonio). 2018;28(3):244-251. doi:10.1111/vec.12720
- Wortinger A. Nutrition. In: Sirois M, Wortinger A, eds. Principles and Practice of Veterinary Technology. 5th ed. Mosby/Elsevier; 2023:578-604.